Related Posts Plugin for WordPress, Blogger...
Showing posts with label paint. Show all posts

Monday, 4 June 2012

Official 150th Post! Giveaway!

Hello all lovely readers, followers, bloggers...you know who you are!
In spirit of today I have decided to open my GIVEAWAY to all bloggers out there...ones I follow and comment on your blogs often....those that I email all the time...(You also know who you are)
The same rules apply only now more of you can enter. So click the link..answer the questions and good luck!
Please remember its one comment 3 answers. If you leave separate comments you will still only be entered once!

 Today I decided to make a prototype of the pouch for the GIVEAWAY.
I grabbed prints in my favourite colours and set to work. The pouch is loosely based on the Keyka Lou-Pixie Handbag, only I tweaked it a lot to fit in with being a pouch.
I added wadding instead of interfacing, no flap-instead a zip.
This will be staying with me as the zipper is messed up. I will make a brand new one for the winner as well as the other goodies.
Make note this is the second zippered pouch I've ever made so the prototype was necessary.

All fabrics for this pouch came from SurlySheep, with the exception of the striped fabric which came in a scrap bundle from FabricShoppe
The fabric and the rather stiff zipper

Right sides facing 

One zipper end looks great! The other not so much!

Candy stripe fabric

Here is that other zipper end....I must have sewn too close to the tabs as it wouldn't turn out at all...hence why I'm keeping it!

Both sides of the pouch. You know I'm not a the whole thing must match person. Although the fabric looks yellow, it is a slightly darker orange tone.


After sewing up the pouch I was sat thinking of what to do next, ways to improve the pouch and what on my list didn't involve me waiting for anything to be delivered (I'm getting some stamps/ink for my Zakka Style sewing kits found these ones as well as some others)

I actually sewed down those Polaroids on my 'Scrapbook style pages'...I had to be sure the paint was fully dry. I need to add so writing to 4 of them, sash all blocks then they will be done for now. (I need to get a better fabric pen first)

I then before dinner managed to sew up the first HST block in preparation to become some circular pillows (Fathers bright idea)
The one in the photo isn't actually sewn up, I forgot to take a picture of it done, but this is essentially how it looks (only sewn together). 1 block down 3 to go.

Well that's all from me tonight (its 10.37pm!) Siya'll tomorrow =D

Friday, 1 June 2012

The weather...the garden and 4 posts to go!

The weather this morning looked very glum! However my mood was not!

I have a short story to tell before revealing the pictures. In April I placed an order with this shop....I ordered 2 bundles of fabric which I was told would come in separate packages. A week after ordering I received one of the packages....I waited for the other to arrive....only it never did. I contacted the store owner to see what could have happened. She told me they always get separated at the customs office and she'd keep an eye out to see if it would be sent back to her.
Moving to this month. The package still hasn't come or been sent back to her. So very kindly she offered to send me the fabrics I'd ordered again. Some prints were unavailable so I chose some new ones. She sent me the tracking number, which I used to see the progress and This morning my package came!
Neither of us have any idea what happened to the last package and why it never showed up to me or back to the store.
So here is my new fabric....no more money spent so keeping to my ban!


I'll put the fabrics onto my fabric page at the weekend so you can have a look at the prints there. I will say I got some prints from Collections and Designers such as ; Ann Kelle. Momo. Reunion. Indian Summer. Scoot. Hoo's in the Forest. LouLouThi. Peak hour. Riley Blake. Freshcut.  Circa. Dr Seuss......

As I mentioned yesterday I got some new books and sewing items to add to my growing collections
1.How to be popular-Meg Cabot. 2.Finding Violet Park-Jenny Valentine. 3. Candyfloss-Jacqueline Wilson.  4.Air head-Meg Cabot
Sewing items...hook and loop tape....glass head needles....needles with a cool case...wide hemming web...metal bobbins and  dress maker scissors.

We went out in the garden for a few hours too. Weeding and planting. I took some breaks to get some painting done on my last 'Page'
Now all to do is sew down the Polaroid frames and some sashing...

Mother needed me to make her a badge as she is having a Jubilee thing at work tomorrow(by the time you read this it will be my early hours of the morning..) so I made this
She has since pinned it to her RWB outfit top.

I also managed to get my BOM block done before the month ended

All 3 so far. This BOM started in March. You still have time to join in too.

To end this month and begin the new one a short tutorial on how I made my HSTs
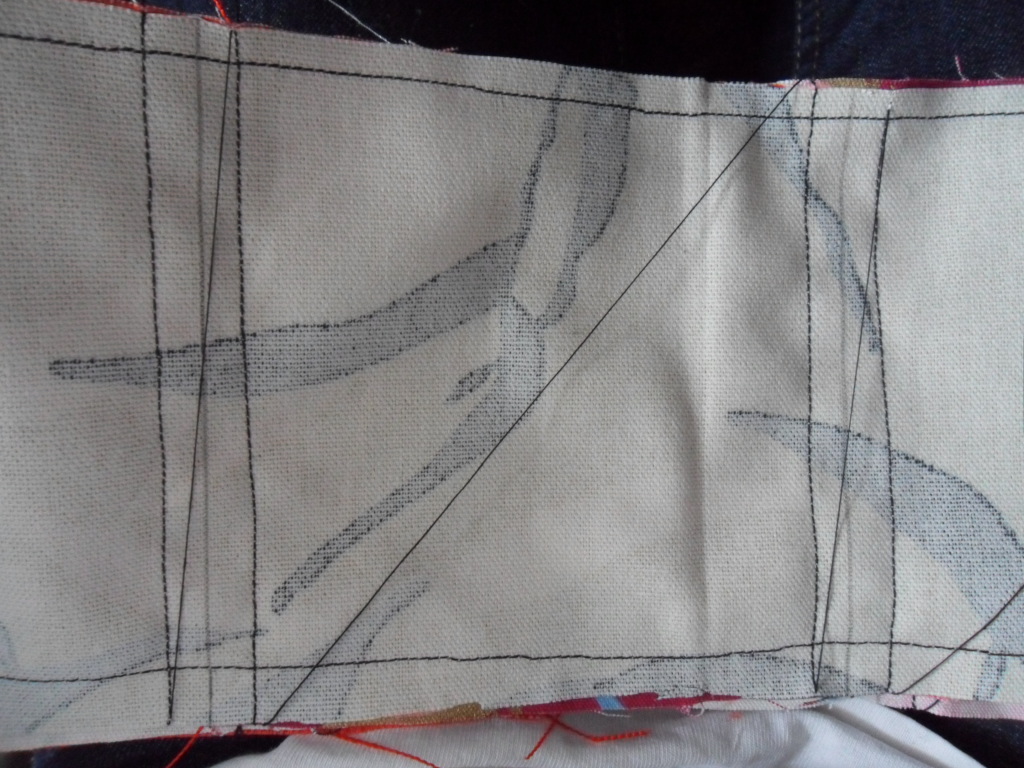
1. Sew 5" by any width divisible by 5 together down both sides Right sides together.
Mark lines on each 5" increment. Sew down each side of the marked pencil line using it as a guide to place your machine foot. Do not cut the thread.
Lift the foot and move the fabric to the next line and sew. Make sure you sew both ends too.

2. Cut down each marked pencil line to get a 5" square

3. Cut diagonally through the center.
4. Then again in the opposite direction

5. Fold out your HSTs and press
6. Trim down to a 3" square.

Done 4 HST's in half the time

I hope that makes sense. If you have any questions please ask.

Well Thanks for staying with me in May! June will be even more exciting. I have a giveaway next Monday to celebrate 150 posts and some exciting new projects.
I'll be back later with my May review =D

Tuesday, 29 May 2012

For the love of HSTs!

Today the weather started off overcast! My kind of day! Nice and cool.

I started my day by clearing up my fabrics. I had a large pile of sheets and pillow cases sitting next to my desk which was annoying me, so I put them into a tub under the bed and out of my way! The table now has my WIPs so they are nearer to me.

I borrowed my Folks bed space to use to measure the backing for my D16 quilt tops...I had to iron the backing as it was more creased than expected..it was folded all that time and magically with loads of creases...Very odd.
I went with the colours of the sashing. Some nice plain backs...no fancy prints. Both bedsheets. I haven't taken pictures...I shall tomorrow.

I noticed the fabric I had coloured somehow got wet and the colours had faded and blotched. So thinking quickly I grabbed my Acrylic paints

I had to paint out the whole butterfly and add in the details best as. I was not amused!


With Father's not so bright idea and fabrics cut I started sewing the strips to make HSTs. 5" strips by various lengths. Sew down both sides. Mark at 5" increments. Sew on either side of the marked line not taking the thread off the machine....The pictures help explain. If you have any questions on this please ask.


I got Father to so the cutting...as I have to do all the sewing...then the trimming once the HSTs are cut....they make 3" squares after. You get 4 from one 5" block cut through in an X. He even Ironed them all ready for me to trim down...all 144 of them.....


This is not I repeat NOT FMQ. I actually did it with my regular sewing foot whilst Father was taking his sweet time using the iron. I was thinking of doing this pattern on my D16 quilts...not sure yet. The fabric was easy to move at least. Any thoughts or ideas?


Then as Father was still using the iron! I finally made a start on my BOM block for Quilt Story... I needed to iron it fist so yeah.....This months theme is hourglass.

Tomorrow once ironed I can get this sewn before the month ends! I also have to take a trip to the dentist....at least my appointment is early (10.15) Whilst in that side of town I can check out the charity shops and see what I can find =D

Saturday, 19 May 2012

SNAP!

Today was shopping in the late morning as usual. They have changed the shop layout which is always a pain when what you were looking to buy has moved to some random locations!

Getting back home I was able to finish sewing down all the circles on my MSM Swap Item
My partner requested a sewing machine cover. She liked a range of colours. Reading most of her comments she like a lot of different styles. I didn't want to go too fussy so stuck with to fabric choices. Gingham and Solids. I used some ultra cute ribbon for the ties. Jano agreed to model it.

After finishing that I was able to actually relax and catch up on two other things I totally love! Sketching and painting. 

I bought some fabric pens and couldn't wait to try them out. These blocks are my favourite pink/purple fabrics. Loulouthi, Momo and the others I don't know the designers.....
I found some actual tracing paper to get the sizing right for some specific elements in each fabric. I still have to sew down the Polaroids...but thought best to add the decorative touches first. I have one more block to decorate then these will be done (for now anyway!) I'll show final pictures once the last block is complete. I'm thinking a mix of acrylics and the pens. 
These are the polariods ignore the rest of the fabric that was a before dyeing shot! 
These were actually all scrap pieces I have sitting in a box...The MAM box that is.....

Then I rounded up the evening by making dinner (pasta bolognese bake, fish pie for the boys) and whilst that was cooking sewing up my 2nd D16 quilt top!


It is sewn together now..I just have the end sashing to cut and sew on. I had to unpick a row as the sashing wasn't straight at all! I was not amused! I've learnt now to use more pins! Then I can cut the wadding and backing...and start on quilting. Any quilting ideas? 


Sunday, 5 February 2012

Work of art

So a while back in highschool. Some six odd years now ha! I painted this picture. Yesterday it was on my list of things to do-hang picture on wall- so when I woke up and couldn't get back to sleep I pulled it out


 I was going to put it onto my wall as it was, but looking at it closely some of the colours had faded and it looked a bit old and dated. So me being me decided to give it a make over. I grabbed my acrylics and set to work. I painted out the right corner completely in white ready to be painted over.
 I chose similar colours to what they were before as I didn't want to change the look too much, just brighten it up a bit.
 This was my paint pallet. I spruced up some of the old colours with either darker or lighter shades to what they were before as they were a bit dull and needed to be more eye catching. How many differences can you spot??